Counting phytoplankton cultures with the hemocytometer:
- Sample 1 ml from the culture and place into a microcentrifuge tube.
- Add 10 µl of Lugols iodine solution, close the cap, and mix by flicking lightly with one finger.
- Place the coverslip onto the hemocytometer, take up a few drops of sample with a disposable pipette and discharge some sample into the v-shaped notches on each side of the hemocytometer slide.
- Count the number of algae in the central grid (equal to 25 of the yellow boxes in the image below (from Wikipedia). The slide has two separate grids,each loaded from its own v-notch; count both and compute the average.
- The number of cells per ml is equal to the number per central grid times 104

Note: The lab has a larger-volume hemocytometer, the “Nageotte” for counting more dilute samples. Its 40 rectangles = 50 ul, so the number of cells in 40 rectangles, divided by 0.05, equals the number per ml. For even more dilute samples, say 100-1000 cells per ml, we have nanoplankton chambers, which hold exactly 0.1 ml, and Sedgewick-Rafter cells (rectangular chambered slides), which hold exactly one ml.
For more details, view this link.
Automatically counting phytoplankton cultures with the hemocytometer
Load the hemocytometer with a drop of culture as you would for a manual count (see above).
Take an image of the hemocytometer with the 4x lens and the optivar set at 1 (the rotating ring that can set extra magnification for 1, 1.25, 1.6, or 2x). Save the image as a jpeg and open it in ImageJ.
Commands:
Image>type>8-bit
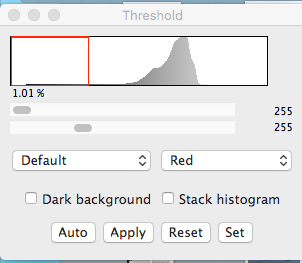
Image>Adjust>threshold
Move the bottom slider in the threshold window to make the particles red and everything else white. Move that slider to the left to eliminate faint objects you don’t want to count. Hit “Apply”. You should now have a binary image (just black dots on a white background).
Analyze>Analyze particles
Set the parameters in the “Analyze Particles” box like this; hit “OK”:
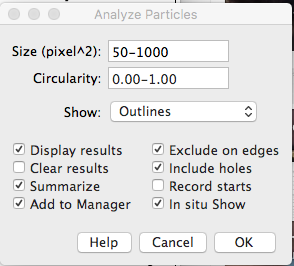
You should get various windows with data on particle number, size, etc. The “Summary” window gives total counts, “Results” window gives the size (in pixels) of each particle, etc. Individual particles that the program has counted are labeled and numbered in the image.
If you were manually counting, the total particles in a grid times 10^4 would give particles/ml (see above). In this case, the image captures more than the whole grid, so multiply the total number of particles times 0.449 x 10^4 to get particles/ml.
A few notes:
- It is VERY important that the magnification and program parameters are set properly. If you use a different lens or optivar setting that would change everything.
- You can’t reliably use the size of particles in pixels to calculate their real size because the thresholding process could shrink them and the procedure is not calibrated for sizing. Basically, we just want to “binarize” the image into particles and everything else.
Protocol for Strombidium rasoulzadegani culture maintenance:
S. rassoulzadegani are kept in well plates (6 well wellplate with 10 ml liquid per well; bottle cultures can also be grown) in F/2 growth medium (0.2 µm filtered seawater with F/2 growth medium added and autoclaved; Sigma cat. no. G9903) at a salinity of 30. Cultures are kept in an incubator on a 12-12 hour light-dark schedule at 18˚C with humidity above 65 %. The chlorophyte Tetraselmis chui (strain Ply-429) is used as food at a concentration of approximately 1 x 10⁴ cells ml-1 and replenished weekly or when algae are not visible in cultures. New wellplates are set up weekly with ciliates transferred from wells with greatest quantity of ciliates. At least 10 individuals are usually moved to a new well; however 1 individual may be isolated to generate a clonal culture. Ciliates are also randomly mixed between cultures to maintain genetically diverse populations. If bottle cultures are grown, 3/4 of the liquid is changed out via reverse filtration using 10 µm or 20 µm mesh and a tube to siphon liquid off of the top of the culture. New F/2 medium at the appropriate salinity with 1 x 10⁴ cells ml-1 of Ply-429 is added to the remaining 1/4 of the culture. Several rinses may be done with medium without Ply-429 if the culture appears contaminated (i.e. other form of algae or other organisms in culture).
Protocol for SEM preparation of ciliates
- Pick ciliates into 2.5% filtered glutaraldehyde In seawater using a drawn capillary pipette
- Leave in fridge > 1h
- Pick into well insert containing DIW . We use Costar #3472 24-well plates with 6.5 mm well inserts containing 3 um pore size PTE filters glued onto the bottom. The ciliates will stay in the well inserts through the whole procedure, as they are transferred through the drying steps.
- Transfer through ethanol series, 10 minutes each in 50%, 70%, 95%, 100% and 100%. To do this, hold the well insert with DIW down onto a kimwipe until most of the liquid has been wicked away, then add the 50% EtOH to the insert and place the insert into a well containing 50% EtOH. It is better to have the level of EtOH in the well outside the insert to be lower than that inside the insert, so that gravity will slowly pull the EtOH through the filter and out of the insert rather than the reverse. If EtOH is pushing through the filter into the insert from below, ciliates can get swirled around and may pop. After 10 min, wick that solution away and add the next concentration, each time wicking away the alcohol.
- After the second 100% EtOH soak is wicked away, place in hood and add a few drops of tetramethylsilane (TMS) to the insert.
- When TMS has completely evaporated (a few min), cut the filter from the bottom of the insert using a scalpel and place it directly onto a stub with double-sticky carbon tape (sample side up). At this point, the filter is brittle and the ciliates are weakly stuck to it. In our experience, the sputter-coating step will result in loss of most of the cells from the filter, so we “sweep” them off the filter onto the surrounding sticky tape using a broom that consists of a short human eyebrow hair glued to a syringe needle. Sometimes the dried ciliates will adhere to the broom but will come off onto the tape easily; sometimes they fly off at 100 mph inexplicably when you approach them. That’s why you need to pick at least 50 of them to start.
- Store in plastic stub box in a vacuum desiccator or a ziplock bag with dessicant prior to sputter-coating.
Making f/2 growth medium for algae:
1.Take medium concentrate from the freezer and thaw it in a water bath (tap water in a large beaker or in the sink).
2.Filter 1.5 L of seawater through a 0.45 µm filter.
3.Check the salinity with the refractometer, and dilute to 30 ppt with deionized water, if necessary.
4.Place the 1.5 L in a 2 L polycarbonate bottle.
5.Add 30 ml of concentrate.
6.Place the cap loosely on the bottle (just a half turn or so, until the threads just engage), and label the bottle “F/2, 20 ppt’, using labeling tape.
7.Place a piece of autoclave tape on the bottle.
8.Autoclave at 121 degrees C for 20 minutes; MAKE SURE THE AUTOCLAVE IS SET FOR LIQUIDS (slow exhaust).
9.Allow the medium to cool at least overnight, then dispense into plastic tissue culture flasks, screw on caps, and store in cabinet.
Weekly Dock Sampling
Supplies:
*Prepare JD’s fixative (make it fresh every time; ingredients in hood and fridge):
49% PFA (stock concentration 40%): 49 ul
49% RNAlater: 49 ul
2% Trizol: 2 ul
“Weekly sampling” notebook
10 or 20 L carboy
20 um plankton net
refractometer, bulb thermometer
25 mm GF/F filters
200 um mesh cup
47 mm polycarbonate filters (10 um & 2 um)
47 mm nylon filters (80 um)
6 RNAse-free microcentrifuge tubes (1.5 ml; 2 red, 2 green, 2 blue)
Qiagen RLT buffer
aluminum foil
sharpie marker (fine point)
Lugol’s iodine (non-acid)
250 ml opaque bottle (1)
Filtration funnel and flask for chlorophylls
Large plastic filter apparatus (2), autoclaved
Procedure:
Samples
• IF POSSIBLE, TRY TO SCHEDULE SAMPLING TO BE WITHIN ONE HOUR ON EITHER SIDE OF HIGH TIDE.
• Record time, date, environmental data, and sample information in the green notebook
• Plankton tow (see: https://www.youtube.com/watch?v=ZHWxztIzw1o )
• Carboy (open the tap and submerge the carboy upside down, letting the air flow out the spigot as the carboy fills up; then invert and cap the carboy).
Environmental measurements
• Filter 100 ml from the carboy through a 25mm diameter, GF/F glass fiber filter, fold the filter and wrap it in foil. Label the foil with tape and place the filter in a Ziploc bag in the -20˚C freezer. THIS MUST BE MEASURED WITHIN 1 MONTH.
• Save 200 ml from the carboy into a 250 ml opaque plastic bottle. Preserve with 4 ml non-acid Lugols and store in the walk-in refrigerator.
• Record the temperature and salinity (measured with thermometer and refractometer, respectively) in the spreadsheet and in the notebook, and note the state of the tide (New London station) (https://tidesandcurrents.noaa.gov/noaatidepredictions.html?id=8461490 ).
• Take a quick look at the tow and note in the spreadsheet, qualitatively, what you see (lots of tintinnids, chain diatoms, dinoflagellates, etc.). If you note any “flagship” ciliates (Laboea, green strombidiids, Pelagostrobilidium, conspicuous tintinnids, etc.), record that as well. Pour the tow contents (cod end) into a large plastic beaker and place it in the incubator until later, when cells can be picked.
Water filtration for DNA and RNA
1. Rinse all materials (bottles, sieve, plastic beakers) with sample water. Dip forceps in ethanol, but rinse the tip with sample water before use.
2. Very gently, pass 2.5 L of sample through a 200-um sieve submerged in a plastic beaker.
3. Using forceps, load two large amber-colored plastic filtration units with 47 mm, 80 um pore-size nylon filters Make sure o-rings and threads are in correct place to avoid leaks. Filter 1L in each unit, then remove the filters with forceps, fold twice and transfer into separate RED RNAase-free microcentrifuge tubes with 1000 uL of RLT buffer. Make sure that the filters are completely submerged in the buffer. Label the tubes with date and filter pore size. Place immediately in a sample box at -80˚C until extraction. Pour the filtrates into a plastic beaker.
4. Rinse the filter units with deionized water. Load the units with 47 mm 10 um polycarbonate filters. Repeat the filtration process with the filtrate, passing it through 10 um filters. Add filters to separate GREEN RNAase-free microcentrifuge tubes with 1000 uL of RLT buffer. Make sure that the filters are completely submerged in the buffer. Label the tubes with date and filter pore size. Place immediately in a sample box at -80˚C until extraction. Pour the filtrates into a plastic beaker. Repeat the process using 2 um filters and placing the filters in BLUE microcentrifuge tubes. If a filter becomes clogged during filtration, it can be replaced, making sure all filters from the same size fraction are stored together later in the same tube. If the filtration cannot be completed, record in the notebook and spreadsheet the actual volume filtered (read approximately from the upper funnel). Label the tubes with date and filter pore size. Place immediately in a sample box at -80˚C until extraction. Discard the filtrate from the 2 um filters.
5. After all filtration is done, the filter units should be rinsed with deionized water (DIW), then autoclaved. Rinse the carboys in DIW and air dry.
Preservation for WTA/WGA (single-cell ‘omics) from concentrate and/or net tow; not every time, but when distinctive or highly abundant species are present
Before starting, wipe space and pipettes with ethanol/RNAway. Use filtered RNAse free tips; RNAse free tubes.
– Single cells picked from plankton tows, stored in JD’s fixative (paraformaldehyde/RNAlater/Trizol: 20 ul fixative + 100 ul dense cell suspension or single cells in a drop of water)* at -80˚C until WGA/WTA. NB these cells may remain “recognizable” and also good for gene expression.
– Single cells picked from cultures and field samples, stored in WTA kit buffer (SMART-Seq v4 Ultra Low Input RNA Kit) at -80˚C for … days until WGA/WTA. NB these cells are ones we can assign genus or species names to just by observing their morphology (Schmidingerella, Laboea, etc.) and will be stored for gene expression.
SMART-Seq kit. Pick cells in 1ul sample water, then add 1.4ul nuclease-free water, then add 0.25ul of lysis buffer (10X Reaction Buffer and RNAase inhibitor (use lysis buffer for maximum of 3 weeks; then make fresh).